
First of all, Happy New YEAR! Jessica has been busy getting tons of awesome new authors and tutorials ready for you. In the meantime, I wanted to share a new technique that I have learned from a very talented artist and furniture re-finisher, Jodi L Skantz.

I have been following Jodi, owner of the Painted Mantle in Picayune, Mississippi for some time. I love her work and creativity and wish that it wasn’t so far for me to go and take a class from her. I wanted to incorporate her furniture style into my signs. I was so happy when she offered a live class on her Etsy page! Jodi was so sweet and her precious 10 year old daughter, Avi was her helper. With Jodi’s permission, I am going to share with you a written tutorial of her technique. If you decide you want to try furniture I will share the link for Etsy.

First you are going to decide on a design that you want to use! I recommend checking out some of these designs in this BUNDLE . Next you want to paint the entire board white. I used a Glidden flat white sample size. I love paint samples! It can just be a light coat. As you can see above it is going to be covered with more paint.

For the next step I used a cheap chip brush and did a dry brush technique. You are not going to clean your brush in between colors. You are going to simply wipe it with a cloth until no more paint comes off and move on to the next color. Before you start painting have an idea of where you want the design to be, making sure that colors that you desire are in the areas you wish. I did a tutorial on planning your design colors. You can check that out HERE.
You are going to use one color at a time making random strokes on the board. As you move on to another color you are going to overlap in some places. Trust me…. It will look great. I have used several different kinds of paint. I used what I had and the colors I liked. I used some Valspar samples I liked, Waverly Chalk paint and Glidden paint samples. Just keep adding color until the entire board is covered. It is ok to overlap colors and change them if you don’t like the colors that are next to each other. I also add random colors to the edges of the board. Now for patience! Let it dry completely. You can use a hair dryer or heat gun to speed the process. The next step starts the magic! Do you have your stencil ready?
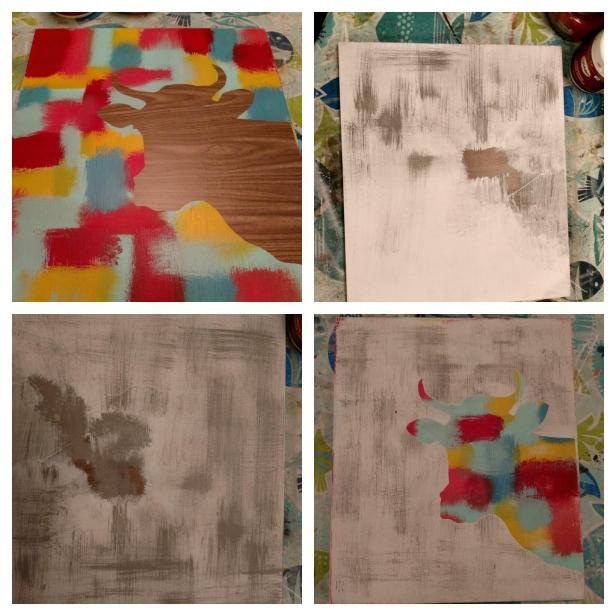
Now you are going to use a reverse stencil, AKA a decal. You want to weed it the same as you would weed a car decal. As shown, place you design over the area that you desire. Make sure that the edges are pressed down really good.
Now paint over the stencil with white paint. Make sure to brush the paint away from the stencil so that you don’t push paint under the edges of the stencil. You can let some of the color show under the white if you desire. I like to let the color show around the edges. If you get to much coverage that can be remedied later. I brush the paint on in both directions. The brush lines crossing reach other adds more texture.
Now let the white dry. You can add more white paint if you want a better coverage. Next step, you are going to paint over the white with a light grey. Once again I used a chip brush and I don’t load the brush with as lot of paint. I feather it on randomly. If you get to heavy handed you can feather white back in after the grey has dried. When you are happy with the paint coverage gently remove your stencil and admire your Magical Hot Mess! Let it dry. You are almost finished!
For the next step I used my trusty mouse palm sander from Harbor Freight. Sand the areas of white to get more color to shine through and smooth the paint so you won’t have bleed when you stencil the words. It looks good to let the colors show on the edges. Also carefully sand the colorful design. You may find this scary but this is where your colors will blend and change. More magic happens. Go slow when doing this to get the hang of it. When you like the way it looks you are ready to add the stencil for the words and paint them in the color of your choice. Now to soften the colors and makes them pop you are going to stain the entire board. I used Varathane Stain in Summer Oak but you can try other stain colors. I wouldn’t use anything too dark. When Jodi did hers she used Early American stain by Minwax. Once the stain is wiped away and dries your are ready to seal your project. I used Minwax Natural wax because I like that look. I wax most of my signs that are for inside use. You can use what ever you like best!
 I hope you enjoy doing this as much as I do. I love to see what happens when you sand away overlapping paint! You never know what magic can happen!
WATCH THE VIDEO!
If you are interested in learning how Jodi Skantz does her technique on furniture please check out her video on Etsy and if you are ever in Picayune, Mississippi stop by the Painted Mantle. You can also follow The Painted Mantle on Facebook.

What kind of board do you use? I’m just learning about this hot mess technique
LikeLike
I have been using birch plywood. That is my preference. I have also used sanded plywood.
LikeLike